Make a Weather Station with a Raspberry Pi
Last Update: Jun 7, 2024
I wrote a book! Check out A Quick Guide to Coding with AI.
Become a super programmer!
Learn how to use Generative AI coding tools as a force multiplier for your career.
Today I’m going to show you how to make sort of a mini weather station with a Raspberry Pi. This is an ongoing project of mine that I’ve been tinkering with so I’ll share my learnings with you. It started with a project I wrote about last month, and is an improvement on it.
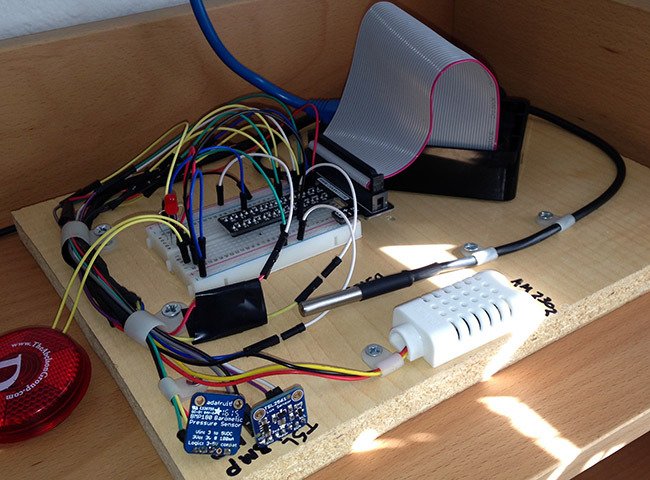
A core part of the “Internet of Things” movement is the idea of devices that gather data and send it to the Internet. That data is then acted on or observed for later. It’s a simple concept and has been going on for a while but lately it’s been getting cheaper and easier to do. This project is a great example of that.
While this seems like a long tutorial, it only takes about 30 minutes to complete. Let’s get started.
Once you complete this your Raspberry Pi will measure:
- Temperature
- Humidity
- Atmospheric Pressure
- Lux
You can send your results to:
- Google Spreadsheet on your Google Drive
- ASP.Net Web API on your website
What you’ll need
For this project you will need:
- Raspberry Pi 2 or Model B - (Get one here for $35!)
- AM2302 Temperature / Humidity Sensor
- BMP180 Temperature / Barometric Pressure Sensor
- DS18B20 Waterproof Temperature Sensor
- TSL2561 Digital Lumosity Sensor
Optional:
- Breadboard and jumpers (Get a kit here) None of this stuff would be anywhere near as easy if it weren’t for companies like Adafruit. I recommend getting your sensors from them to support their innovation in this space. Newark is one of the original distributors of the Raspberry Pi, they are fast and very reputable.
Wiring
The wiring for this project is shown below:
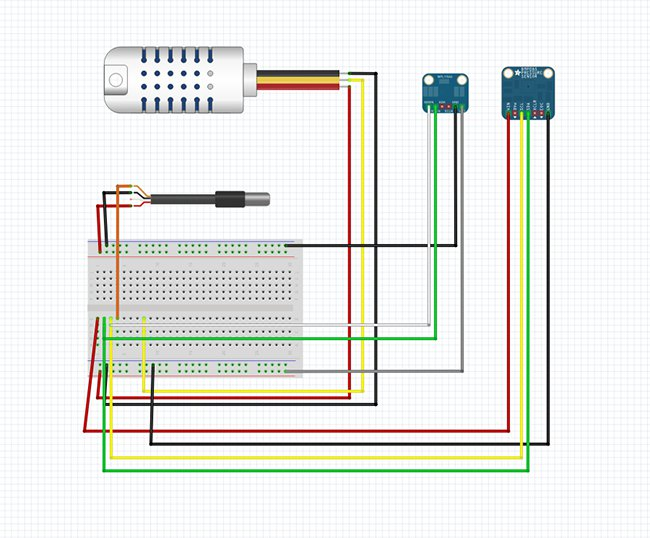
While this may look confusing at first, it’s a pretty standard setup for each sensor. Here’s some additional information on how to wire up each one if the diagram isn’t helpful.
Installing the software
This tutorial has been tested with a fresh install of Raspian. The instructions should be fairly accurate for other Linux distributions as well.
SSH into the pi (or open a command window) and get’s start out in your home directory and make a folder for your sources.
cd ~
mkdir sources
cd sources
Now we can start installing sensors.
Setup the AM2302
The AM2302 is a temperature humidity sensor. It is a DHT22 sensor that’s wired with a pullup resistor and casing. I found it easier to use this one than just the DHT22 kit.
For this sensor we’ll be using the Adafruit Python DHT library:
git clone https://github.com/adafruit/Adafruit_Python_DHT.git

cd Adafruit_Python_DHT

sudo apt-get update

sudo apt-get install build-essential python-dev python-openssl

sudo python setup.py install
This will install the software necessary to interact with the AM2302
Test the AM2302
There is a test script you can use to verify the sensor is working. Run AdafruitDHT.py and “2302” is the sensor, and “22” is the pin you’re using. Change it if you hooked it to a different pin.
cd examples
sudo ./AdafruitDHT.py 2302 22
You should see something that looks like this:

DSB18B20
The DSB18B20 is a digital one wire (Dallas one wire protocol) thermometer. If you get it “with extras” it comes with a cord and waterproof casing which is what I went with.
You will need to add one wire Support. Open up your boot config:
sudo nano /boot/config.txt
Add the following text to that file:
dtoverlay=w1-gpio
Save the file and reboot:
sudo reboot
Testing the DSB18B20
To test it you’ll need to load the following modules into your kernel:
sudo modprobe w1-gpio
sudo modprobe w1-therm
Note: you can do the following to add them to your kernel on boot:
sudo nano /etc/modules
add the following lines:
w1-gpio
w1-therm
Save the file and the next time you start they will be loaded automatically.
To check your device:
cd /sys/bus/w1/devices
ls -la
You will see a folder starting with 28- this is your device based on the serial number.
cd 28-xxxx (change this to match what serial number pops up)
cat w1_slave
You should see something like the following:
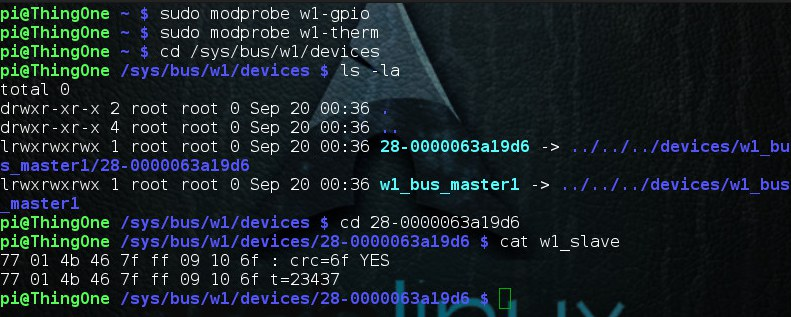
If it says “YES” it’s working. If not, you may need to check your wiring.
Configuring I2C
Next you will need to configure I2C for your system:
sudo apt-get install python-smbus
sudo apt-get install i2c-tools
You may get “already installed” messages from this, depending on how your system is setup.
Add the modules to your kernel on startup. Open up /etc/modules
sudo nano /etc/modules
Add the following to it:
i2c-bcm2708
i2c-dev
Now you will need to modify your boot config:
sudo nano /boot/config.txt
Add the following:
dtparam=i2c1=on
dtparam=i2c_arm=on
Reboot your Pi:
sudo reboot
Testing I2C
You can see what devices are connected to your I2C bus by running the following command:
sudo i2cdetect -y 1
You should see something like this:

You’re ready to go!
TSL2561 Sensor
The TSL2561 is a Lux Sensor, it measures the amount of light it detects, useful to see how bright the sky is that day.
Let’s grab some sources to help out with this:
cd ~/sources
wget https://raw.githubusercontent.com/adafruit/Adafruit-Raspberry-Pi-Python-Code/master/Adafruit_I2C/Adafruit_I2C.py
wget https://raw.githubusercontent.com/seanbechhofer/raspberrypi/master/python/TSL2561.py
Testing the TSL2561
To test out your sensor run the following:
sudo python Adafruit_I2C.py
sudo python TSL2561.py
You should see something that looks like this:

Its up!
BMP180
The BMP180 is a barometric pressure sensor with a thermometer. It’s also really easy to get working. Once again we’ll be using some Adafruit libraries:
git clone https://github.com/adafruit/Adafruit_Python_BMP.git
cd Adafruit_Python_BMP
sudo python setup.py install
Testing the BMP180
To test it:
cd examples
sudo python simpletest.py
It should look like this:

Gather data from all the sensors
Here we will gather the data from all the sensors using an application I wrote. This reader will gather all the information and display it to the console, or send it out to the internet.
cd ~
git clone https://github.com/JeremyMorgan/Raspberry_Pi_Weather_Station.git reader
This will copy the scripts into a folder called “reader”. To test them out, type in:
sudo python readings.py dryrun
This does a “dry run” that does not send the data anywhere, but displays it on your screen:
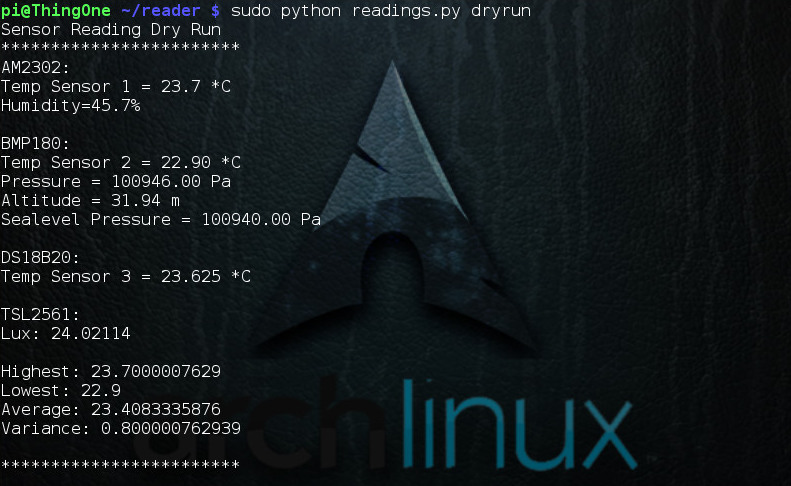
You’re ready to go! If you run it without the “dryrun” parameter it will build a JSON object and attempt to send to a web endpoint, which I will show you how to build later in the tutorial.
Optional: Google Spreadsheets
You can output data to a Google Spreadsheet using my application you downloaded from GitHub. You will need to setup OAuth with Google, and create a JSON file. Instructions are here:
http://gspread.readthedocs.org/en/latest/oauth2.html
You will want to store the generated JSON file in the /home/pi/reader/ folder.
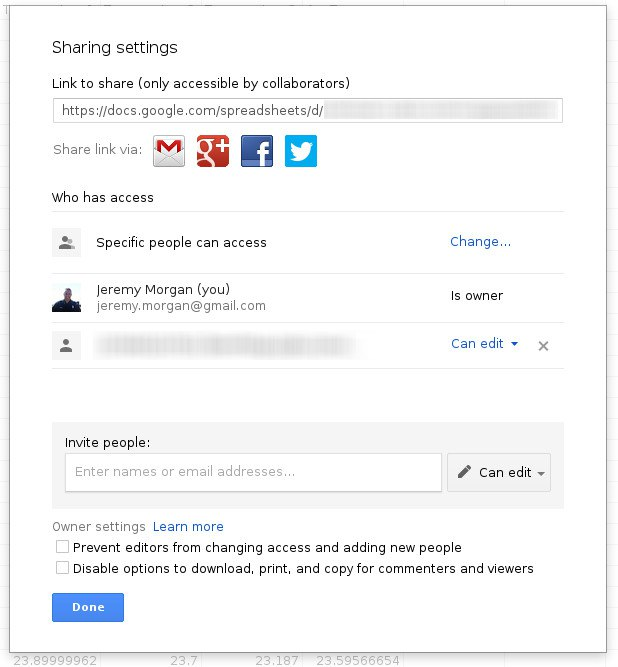
One thing you will need to is open up that OAuth JSON file and look for “client_email”. It should look like this:
“client_email”: “1233453343244-asdlkjried8ss98eeEic@developer.gserviceaccount.com”,
After you create your spreadsheet, you will need to add that email address as one who can access the sheet under sharing settings:
Next, open up the following script in the folder:
sudo nano google.py
Replace the GDOCS_OOAUTH_JSON value with the name of your JSON file you downloaded. Set the GDOCS_SPREADSHEET_NAME with the name of your sheet. Save it.
Type in
sudo python google.py
if all your information is correct, it will start running and adding rows to your spreadsheet every 30 seconds:
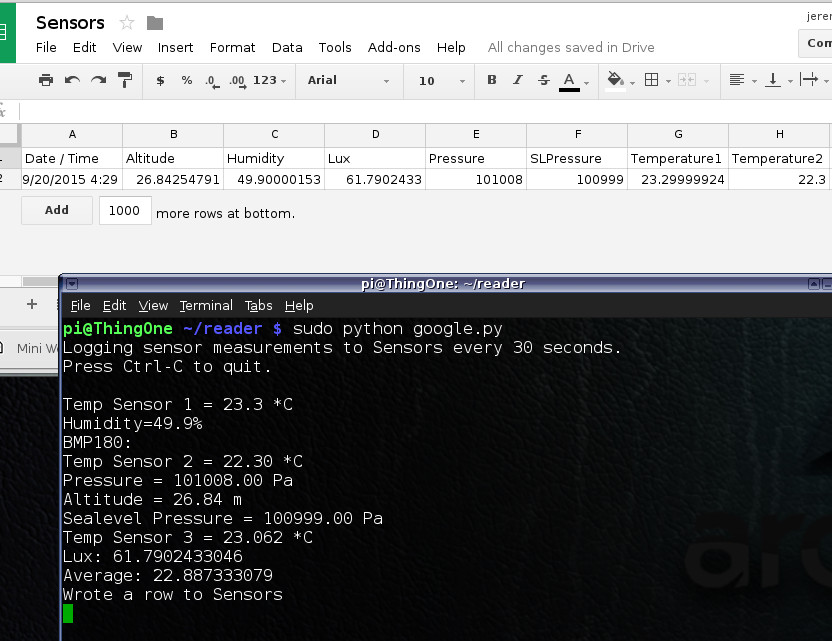
Congratulations! You can now send your data to a Google Spreadsheet. You can run this as a service if you want and store all your data on a Google Drive.
{% include custom/asides/iot-newsletter-banner.html %}
Send it to the cloud
One thing I did with my setup was create a Microsoft Azure website to act as an endpoint for my setup. You could also run this on any ASP.Net website with a host that supports Web API.
Setup the API
You can clone the following repository and open it up in Visual Studio (Should work in 2012 and up)
https://github.com/JeremyMorgan/Raspberry_Pi_Weather_Station_API.git
You will need to create a database, the creation script is in /Install SQL folder. Then plug those values into your Web.config and set the folder as an application and start it up!
At this point, you will want to open up readings.py and change the “url” field at the bottom of your endpoint, for example:
url = "http://mysite.com/api/readings
I have found it’s really easy to just create a site on Microsoft Azure for this, and you get 5 free websites, so why not? You can always point it at a different SQL server if you choose.
Setup the Web UI
I built a cool little UI for this that uses AngularJS to and some plugins to create some cool visualization:
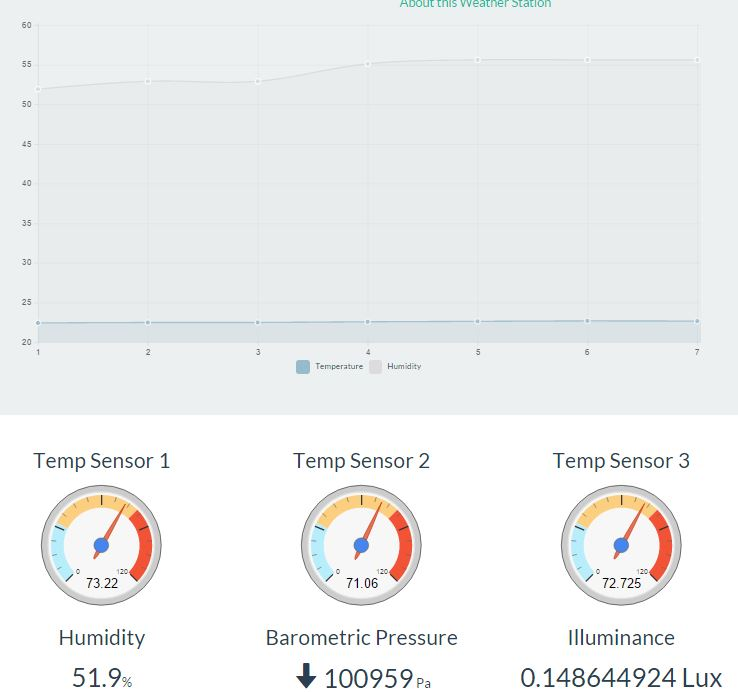
If you’d like to run this, you can download it from Github and run it on any website that supports HTML.
https://github.com/JeremyMorgan/Raspberry_Pi_Weather_Station
Make sure and change the settings in home.services.js to reflect your website:
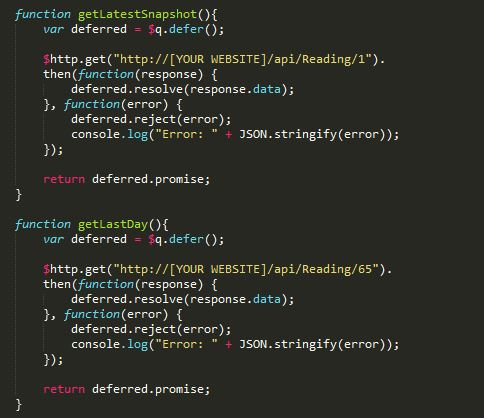
I’ll be making some changes to it soon, but for now it’s a cool little visualization for your setup.
Summary
Well I hope you made it through all the way to the end and got this set up. Gathering data is one of the cool parts of IoT, but what are you going to do with it? The possibilities are endless. You could put this in your house to make thermostat adjustments, or put it in a storage area to make sure something valuable is safe. I hope this project inspires you to build more stuff.
To keep up on the progress of this project, follow me on GitHub or check my Twitter updates to see what’s next. I have a lot of cool things in store.
Want to learn more about the Raspberry Pi? Check out the Raspberry Pi for Developers course!


